
 Introduction
Today’s cameras aren’t just cameras, they’re computers that capture light. Inside is a complicated mix of manual mechanisms and programmable electronic circuits that now offer
us image capture functionality like never before.
After buying a new camera we learn the essential settings that mean we can quickly use it and for much of the time these will suffice for most of our work. Now though, with
so much tech packed inside, there’s a host of useful settings we don’t use. Obviously not all cameras will have the same options but many have lots of these same functions.
So let’s take a look at some of those features, both electronic and manual that you might have available but haven’t learnt to use yet.
Bulb
Ever wanted to take a really long exposure but were held back by the limits of the camera’s own exposure settings? My camera’s longest exposure is 30 seconds which for some
scenarios isn’t enough. To take longer exposures I use Bulb. This facility lets me decide when to open and close the shutter. So if I wanted a 10 minute exposure I simply select
bulb, press the shutter and time it out. Then press the shutter again to end the exposure. Really useful for low-light situations like night or astro photography. Works best
with a remote release so the camera doesn’t have to be touched and risk camera shake to open and close the shutter. Take a look at the example here where the lights of the cars
have left long trails because of the length of the exposure.
Exposure bracketing
Most of the time we’re setting up to take a picture we see the scene, decide the shutter, aperture and ISO combination then take the picture. We’ll then do a bit of chimping
looking at the scene on the camera’s screen to check the capture is to our satisfaction. If the exposure isn’t quite right we can make some adjustments and repeat that process
until we get it right. That’s a bit of fiddling-about to check that exposure but there is a quicker way to get closer to the exposure we want by using the exposure bracket feature.
Exposure bracketing is a function that captures the same scene multiple times at different exposures. One image at the expected exposure, one image one stop under-exposed
and one image one stop over-exposed. Three images all at different exposures. Some cameras even allow the photographer to select the bracket difference, so it could be two,
three or more stops difference either side of the expected exposure.
This feature is very useful for shooting HDR images where the same scene is captured multiple times and then blended together using the best exposed parts of all the images.
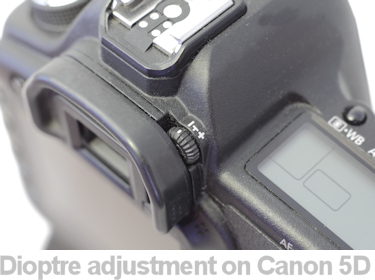 Dioptre adjustment
Most folks don’t have perfect eyesight and as photography is all about looking at a scene with as much accuracy as possible then we can probably do with all the help we can
get to achieve this. Dioptre adjustment is a facility to correct poor vision and is found on many cameras, usually next to the viewfinder. The idea being that the photographer
can view the scene at its most sharp after adjusting the viewfinder dioptre settings.
Mirror lockup
If you’re using a traditional DSLR camera with a mirror, you may well have a feature called ‘mirror lockup’. Use this when a shot is required that needs as much sharpness as possible.
Once activated, the mirror is locked in the up-position before the exposure starts, removing the risk of the vibration and therefore camera movement from the flipping mirror
during the start of the exposure. Very often used when taking long exposures with the camera on a tripod. Might well be used at the same time as bulb mentioned above.
"With so much tech packed inside, there’s a host of useful features we don’t use."
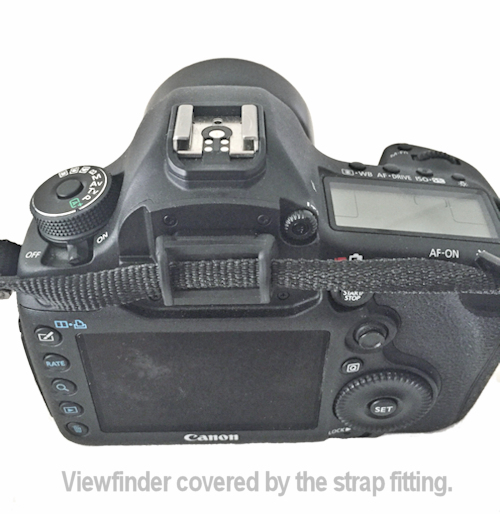
Viewfinder cover
Ever wondered what that little plastic or rubber cover that’s attached to the camera strap is for? This fits over the viewfinder to stop light entering the camera through
the viewfinder when the photographer doesn’t have an eye pressed up against it. This is usually when long exposure images are being taken and the photographer only initially
looks at the scene to set up, then moves away whilst the image is taken. Stopping this light entering the camera from the rear means there’s no risk of additional unwanted light ruining the exposure.
Depth of field preview
Look through the viewfinder and activate the depth of field preview and you’ll see in real time how much ‘depth’ you’ll get from your chosen aperture setting.
On my Canon the button is found at the front of the camera next to the lens mount and is very useful for checking that what you consider to be important in the image is in, or indeed out, of focus.
Without using this you’re left to guess how much of your scene will be rendered in and out of focus. Whilst it is very useful, it’s also quite difficult to use as when
the lens is stopped-down to the working aperture, the scene will always lose light as you view it through the viewfinder making it harder to see what’s sharp and what isn’t.
Nonetheless, worth knowing how to use this little function.
 Card formatting
We all delete images from our memory cards, either one by one or by selecting everying on the card and deleting. This obviously returns the memory card to its empty state and we go again with shooting our
work. However there's a reason why many cameras feature an option to format the memory card. As with any computer file, the images are stored on the card and when first created are placed at a point on the
card that the computer considers to be free. This can be anywhere on the card and eventually the files are deposited all over it. This normally doesn't cause a problem but by formatting the card the file management
can start afresh and place the files in a more ordered fashion.
A format is also a good idea when a new card is used in the camera for the first time or even if a card has previously been used by another camera. By formattng the card this ensures the card is prepared just like
the camera requires it. If errors are encountered on a card a format can help to remove those issues too.
It's important to remember that formatting a card deletes all of the data recorded on it so always copy any files to another device before starting the format.
Battery condition
This is about as mundane as it gets but nonetheless a battery condition check will tell you what state the batteries are in and indicate when the battery is about to become unable to properly carry a charge and needs to
be replaced. Obviously it's better to be aware of an impending battery failure than waiting for it to happen when you're out shooting. Taking spare batteries is always a good idea too!
Custom functions
Some functions on your camera will always be of more use than others so it makes sense to have quick and easy access to use them. Custom functions let you program certain buttons
to do other things that replace the default operation. Other settings allow the photographer to choose how the camera operates. For instance, when adjusting exposure, the increments of adjustment can be customised
to the photographer's preferences such as 1/3 or 1/2 stops. Another option might be the bracketing feature we mentioned above, here the photographer can program how many exposures are taken. There will be any number
of options available to the photographer here so picking up the camera's manual and having a read will help to learn about the intricacies.
Shutter and Aperture Priority
Cameras come with a lot of built-in programs, some of which leave all the decision-making to the camera, that is it selects the ISO, aperture and shutter and some programs
which allow the photographer total control and choose all three of those settings. Between those two extremes are programs like shutter-priority and aperture-priority, which lets the photographer decide the shutter speed or
the aperture respectively.
Each priority function has different benefits and therefore suits different scenarios. For instance, shooting landscapes where depth-of-field might be important, then selecting a progam where the aperture is selected
specifically is critical. This then lets the camera decide the shutter speed that leads to the correct exposure. Equally, the photographer can use shutter-priority when they wish to decide the shutter speed and let the camera
decide the aperture. This could be a sports image for instance, where ensuring the subject is sharp at the expense of depth-of-field is ensured. Equally, should the photographer want to blur the subject, then they can pick
a slower shutter speed. In both these scenarios the photographer makes key decisions about the look of the final image and the camera ensures the exposure is accurate. Note though the photographer still
selects the most suitable ISO. This variable never changes in the exposure calculation.
Once the photographer reaches a stage where they wish to move on from a fully-automated picture, the aperture and shutter-priority functions are very useful. I use them regularly as they're a great compromise between
my own creative requirements and automated control.
 Flash curtain sync
This is moving on a little bit as curtain sync involves flash and not all cameras include a built-in flash. Even so, if the camera needs a flashgun to be attached or not, second curtain sync is a really useful creative option.
To work with curtain syncing is to understand a little bit about how flash works with the camera's shutter. Basically, when the shutter is open, the flash fires to light the scene. However if the flash fires at the start of the
exposure the effect will be different than if it fired at the end. Thats because the exposure will also include the ambient light in the scene too. So whatever is photographed will be captured by the flash and also
the natural light around it. Lets look at the mountain bike racer we see here, the flash has fired to freeze him with very little movement and yet the background is blurred. If you look to the right of the image we can see
that the natural light has lit his grey foot and also the green number on the front of the bike as it moved across the scene hence the grey and green blurry trails to the right.
What we can deduce from this is the flash fired at the start of the exposure and whilst the shutter was still open, the rider moved across the scene and natural light still illuminated him a little.
Had second curtain been used, the natural light trails would have been behind the rider as the flash fired at the end of the exposure. In our example we can see there are no trails behind the rider at all.
We can see here how the photographer can make decisions about how they want to light their subject to show it to maximum creative effect.
For completeness, the blurred background is a result of panning the camera with the subject as they pass, which is lit by a combination of the flash and ambient light around the scene.
Conclusion
There are so many functions built-in to our cameras and such is the complexity on offer it takes a while to find out how to use even the most essential settings but once we get past that there's loads of useful options
to make picture taking that much easier. Because of all that additional technology we have to learn about spending some time with the camera's manual is important.
Hopefully this article will inspire you to grab that booklet and learn something new about that little light-capturing computer we call a camera.
All images © Peter Hatter.